Want to finally make money online from your own corner of the internet? Forget the tech headache. This guide shows you exactly How To Start A WordPress Blog On Hostinger—it is faster, cheaper, and far easier than you think. You can go from “thinking about it” to actually live in just 30 minutes.
Table of Contents

This post may contain affiliate links, meaning we may earn a small commission at no extra cost to you. We only recommend products we trust, and your support helps us continue creating helpful content.
I remember the exact moment it clicked for me—this blogging thing? It wasn’t just a hobby. It was a real way to make money.
Up until then, I was doing the usual 9-to-5 grind, thinking that was just how life worked. But I wanted more. More freedom. More control over my time. Something creative that didn’t feel like… work all the time.
And blogging turned out to be that thing.
Forget the “Tech” Myth
Here’s the part most people get wrong—they think you need to be “techy” or know how to code.
You don’t. Not even close.
If you can use Google, you can start a blog. These days, you can have a clean, professional WordPress site up and running in about 30 minutes. No stress, no confusion, no messing around with complicated setups.
The One Thing That Matters
The only thing that actually matters at the start? Picking the right place to host your site.
I’ve tested a bunch over the years, and honestly, most of them either overcharge you or make things way more complicated than they need to be.
That’s why I keep coming back to Hostinger. It’s simple, fast, and doesn’t feel like it’s trying to trip you up every five minutes. If you’re just getting started, it’s kind of a no-brainer.
The Deal
And yeah, I managed to get a deal sorted for you.
If you go through my link, you can start your blog for about £2–£3 a month, grab a free domain name, and knock a bit extra off at checkout.
Not bad for something that could literally turn into an income stream.
Step 1: Pick Your Niche and Name
Step 1: Pick Your Niche and Name
Before we get to the setup, you need a solid plan. It all comes down to two simple things: what your blog is about, and what it’s called.
1. Define Your Niche (What You’re Writing About)
This is your topic. Don’t overthink it, but don’t be vague.
The goal is to figure out what you can genuinely help people with, because that is where your income comes from. People search Google for answers; your blog provides them.
To find your niche, start with what you enjoy talking about—be it travel, finance, fitness, or food—and then focus it.
Finding the Money in the Topic
Instead of just “fitness,” consider:
- Home workouts for beginners
- Losing weight without going to a gym
- Simple meal prep for busy professionals
See the difference? Way clearer and more focused.
2. Name Your Site (Your Domain Name)
Once you have your topic, you need a name for your site. This will be your domain (the ‘.com’ address).
Keep it simple. Don’t try to be too clever or unique, as that often makes it hard to remember.
Choose a Winning Name
Aim for a name that:
- Hints at your topic
- Is easy to spell and pronounce
- Avoids hyphens or weird spellings
Crucial Money-Saving Tip: Do not go out and buy a domain separately before you sign up for hosting. Most Hostinger plans include your domain name for free.
Get your plan first, then claim your free domain during the setup process to save yourself the extra cost and hassle.
Step 2: How To Start A WordPress Blog On Hostinger (The Setup)
Alright, now we get into the part that actually gets your blog online. You need hosting.
Think of it like this—if your blog is a house, hosting is the land it sits on.
No hosting = no blog. Simple as that.
This is where I’d go with Hostinger, especially if it’s your first time doing this. It’s cheap, it’s quick, and it doesn’t feel like you need a tech degree to figure it out.
Choosing the Right Plan
Once you’re on there, you’ll see a few plans. Don’t overthink it—go with the Premium Web Hosting plan.
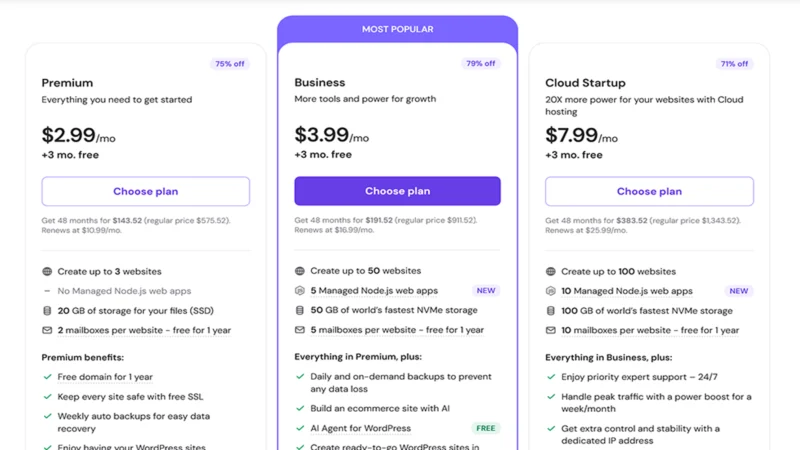
Here’s why I always suggest that one:
It is basically the sweet spot between “too basic” and “why am I paying for all this?”
You can create up to 3 websites (so you’re not stuck with just one idea)
You get your free domain name included
It is still super affordable, even long-term
The Perfection Trap
But the most critical part—the reason this is a game-changer—is that this effortless AI website builder option is now included in the starter Premium plan.
You do not need to upgrade to a higher tier like the Business plan for this convenience. You get it all, right here, in the beginner plan.
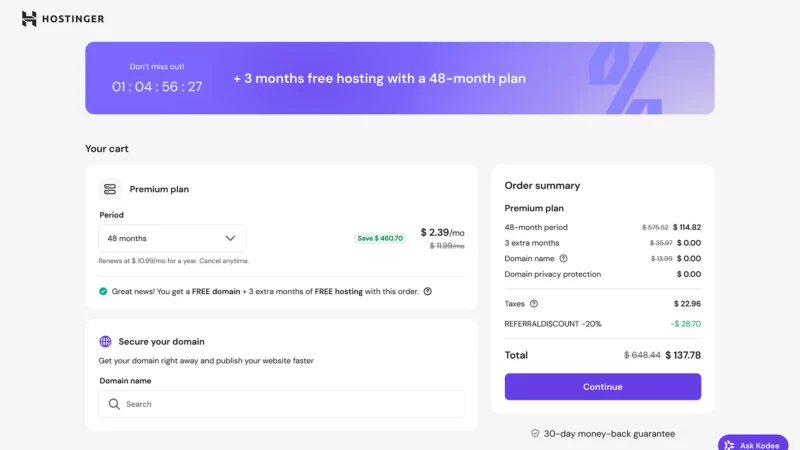
Check the Discount: Now, when you head to checkout, just double-check that the discount is showing. If you came through the link properly, it should already be applied. That is where you’ll see the price drop even more, which—let’s be honest—is always nice when you’re just starting out.
Get that sorted, and you’re officially in the game.
Step 3: Claim Your Free Domain
Alright, this is the fun part—you’re about to lock in your blog name.
After you finish checkout, Hostinger will prompt you to claim your free domain. This is where you type in the name you came up with in Step 1.
Simple Tips for a Winning Domain
A couple of quick tips while you’re here:
- Go for the .com: Always try to grab a .com if it is available. It is what people trust and remember most.
- Keep it simple: If your exact name is taken, don’t panic. Just tweak it slightly. Add a small word. Keep it simple and relevant.
- Avoid weird spellings: Hyphens and strange spellings… they just make life harder later when someone is trying to find your site. Avoid them.
Once you find one that is available, go ahead and lock it in.
That is it. No extra payments, no jumping to another site, no confusion—it is all handled right there.
A Moment of Realness
And yeah… this is the moment most people don’t expect to feel anything—but you probably will. Because now it is real.
You officially own your own corner of the internet.
Step 4: Build Your Blog (Choose Your Own Adventure)
This is the fork in the road. You can either build it manually with themes (gives you more granular control) or let AI do the work (the fast track).
Choose the option that feels right for you.
Option 1: The Classic Way (WordPress + Themes)
This is the way most bloggers have done it for years. Don’t worry, it is still pretty simple, and it gives you a bit more control.
Think of a Theme as Your Blog’s “Skin”
A theme controls how everything looks without you needing to design anything from scratch. Think of it as your blog’s foundation.
Once WordPress is installed, head over to: Appearance → Themes → Add New.
Choose a Winning Theme
A couple solid options to start with:
- Astra (lightweight and super flexible) – What I actually use!!
- GeneratePress (clean and fast)
- Kadence (great if you want something that looks modern out of the box)
Pick one that looks clean and easy to read. You do not need to spend hours here. That is all that matters right now.
Tweak and Move On
Once you have chosen one, hit Install → Activate. Boom—your site instantly has a proper layout.
Now, you can tweak things a bit if you want: Change colours, upload your logo (or just use text for now), adjust fonts.
The Perfection Trap
But don’t fall into the trap of trying to make it perfect. I’ve seen people spend days messing with tiny design details instead of actually starting their blog.
Your goal here is simple: Get something that looks decent… and move on. You can always improve it later. What matters is getting your site live and ready for content.
Option 2: The 30-Minute Launch (Hostinger AI Builder)
This option is for those looking to skip right to the finish line.
The effortless AI website builder option is now included in the starter Premium plan ($2.99/mo). You do not need to upgrade to a higher tier like the Business plan for this convenience.
Instead of staring at a blank WordPress screen, you let AI handle the heavy lifting.
The Setup Process
During the setup on Hostinger, choose: “Create a New Website” → pick the AI Builder option.
It will ask you a couple simple questions.
Nothing complicated—just stuff like: What your blog is about, the vibe you want, or a short description. (Don’t overthink it).
For example, you could say: “A blog about budget travel and simple vegan meals.”
The Result
Within seconds, it builds your site for you.
I am talking about a clean homepage, matching colors and fonts, relevant images, and a layout that actually makes sense.
No dragging things around. No guessing what looks good. No wasting hours.
That is You Live
Once it is done, take a minute to click around and see how it looks. If you like it? Hit publish.
That is you live. Seriously.
You just skipped what used to take people an entire weekend and a lot of frustration.
Step 5. Finalizing the Install & Logging In
Congratulations! You have chosen your design path (Option 1 or Option 2). Now, it’s time to finalize the setup and get the keys to your new digital home.
1. The Installation Finalization
If you chose the AI Builder (Option 2), Hostinger will take a minute to generate your site based on your answers.
If you chose the Classic Way (Option 1) with a theme, Hostinger will now automatically install WordPress for you. You don’t need to download or upload anything; it handles the entire technical setup in the background.
2. Logging In to Your Dashboard (The WP-Admin)
Once the installation is complete, you will see a success message. Hostinger will provide you with a specific, magical link. This is your Admin Login URL.
It will almost always look like this:
yourdomainname.com/wp-admin
Replace “[yourdomainname.com]” with the actual domain name you just claimed.
3. Your Control Room
Bookmark this URL! You will use it every single day to manage your blog.
4. The Credentials
To log in, you will use the Administrator email and password that you created earlier in the Hostinger setup process (back in Step 2). Enter those, and you’re in.
Welcome to the Dashboard
You are now officially inside your WordPress Dashboard (often called the “back-end” or “admin panel”).
5. Don’t Panic
This is your control room. If it looks like a lot at first, do not panic. Every blogger felt that same overwhelming feeling the first time.
You will get used to this interface incredibly fast. It is designed to be user-friendly.
Step 6: Make It Yours (And Write Your First Post)
Your site is now live! It is time to transform “a website” into your personal website.
First, log into your control room, the WordPress dashboard, at: [suspicious link removed].
It may look like a lot initially, but don’t be intimidated; you will get used to it quickly.
Customize and Add Personality
For the AI Site Builder (Option 2)
If you used the AI builder, your site already has a solid foundation. Instead of starting from scratch, you’re just tweaking.
Go in and make a few simple changes to add personality:
- Swap generic images with your own to make it feel more “you.”
- Adjust colors if anything looks slightly off.
- Change any placeholder text.
Do not try to redesign everything. Just add personality.
For the Classic Way (Option 1 – Themes)
If you chose a theme, your blog is basically a clean slate.
Head to Appearance → Customize.
This is your central control panel for the theme. Here, you can easily:
- Upload your logo (or just use simple text for now)
- Choose your brand’s main colors
- Select your primary fonts
Keep it relevant, keep it clean, and move on. You do not need to spend hours here. Pick something decent and focus on the part that actually matters.
Write Your First Post
Now for the part that actually matters—writing your first post. This is the moment your blog truly begins.
Head to: Posts → Add New, and start writing.
Don’t Overthink It
Seriously, do not overthink this. You do not need 50 posts before you launch, and everything does not need to be perfect.
You just need one helpful piece of content.
Think back to your niche—what is one thing someone might search for that you can help with?
Write like you’re explaining it to a friend:
- Keep it simple.
- Be clear.
- Get to the point.
If you are stuck on what to write first, read our guide: First 10 Blog Posts to Write in 2026: The Beginner Traffic Roadmap.
Content Over Design
Here is the truth: your design does not make you money. Your content does.
So get that first post written, hit publish, and now you are not just someone “starting a blog”…
You are a blogger.
WordPress is an open-source platform used by millions; you can learn more about its capabilities at WordPress.org.
How You Actually Make Money From This
Alright—this is the part everyone cares about.
Getting your blog set up is step one. This is step two: turning it into something that pays you back. There are a few solid ways to do it, and you don’t need all of them right away. Just pick one and get moving.
1. Affiliate Marketing (The Easiest Place to Start)
This is where most beginners make their first bit of money. You recommend stuff you already use or genuinely like, and if someone buys through your unique link—you get a cut (commission). Simple.
For example, you could write a post about:
- “Best Budget Travel Gear for Beginners”
- “The 5 Tools I Use to Run My Blog Everyday”
In these posts, you are helping someone make a buying decision, and getting paid for it. That’s it.
2. Display Ads (Set It and Forget It)
Once people start visiting your blog, you can stick ads on your site and get paid for those views (impressions). You don’t need to sell anything yourself; the ads just run in the background.
A lot of bloggers aim for high-paying ad networks like Mediavine, but that comes later once your traffic grows significantly. Early on, just focus on getting people to your site with great content.
3. Your Own Products (Where Real Profit Kicks In)
This is where things get really interesting. Instead of promoting someone else’s stuff, you sell your own.
This could be:
- A simple eBook
- Printable planners or guides
- Design templates
If you have knowledge that helps people solve a problem, you can package it and sell it. And the best part? You keep most (or all) of the money.
You don’t need to do everything at once. Start with affiliate links, build some consistent traffic, then layer the other methods in later. That’s how this turns from “a blog” into something that actually makes money.
Common Starting a Blog on Hostinger Questions
Is blogging still profitable in 2026?
Yeah—if anything, it’s gotten easier to get started.
AI has taken a lot of the boring setup stuff off your plate, which means you can focus on what actually matters—helping people, sharing real experiences, and building trust.
That’s the part that makes money.
Do I need a lot of money to start?
Nope.
You can get your blog up and running for about the price of a couple coffees a month. It’s probably one of the cheapest ways to start something that can actually pay you back.
No big upfront risk, no huge investment.
What if I change my mind?
Then you just back out.
Hostinger gives you a 30-day money-back guarantee, so if you try it and think “this isn’t for me,” you’re not stuck.
Pretty fair deal.
How long does it take to make money?
This is the honest answer—it depends.
Some people make their first bit of money in a few weeks, others take a few months. It comes down to how consistent you are and whether your content actually helps people.
Stick with it, and it builds over time.
Do I need to be a good writer?
Not really.
You just need to be clear.
Write how you talk. Keep things simple. If someone can read your post and walk away with an answer, you’re doing it right.
That beats “perfect writing” every time.
How many posts do I need before I see results?
There’s no magic number, but a good starting goal is your first 10 posts.
That’s usually where things start to click—you get better, faster, and more confident.
If you want a simple plan for that, check out this guide on writing your first 10 blog posts—it’ll save you a lot of guesswork.
Your Future Starts Today
Here’s the truth most people don’t like hearing: The only real difference between someone making money from a blog and someone still thinking about it is action.
That’s it. Not talent, not luck, and definitely not having a “perfect” plan. Just starting. Waiting for the “right time” is a trap—there’s always something. Too busy, not ready, need to learn more. Meanwhile, someone else just gets started and figures it out as they go.
That can be you. 30 minutes from now, you could either still be thinking about it… or you could be live.
Ready to pull the trigger?
Start your blog on Hostinger today for £2–£3 a month. > You’ll get your Free Domain, the AI Site Builder, and my personal “Handshake Deal” discount applied automatically at checkout.
30-Day Money-Back Guarantee. No risk. No fluff. Just your own corner of the internet.
Still on the Fence?
If you want a deeper look before you commit, check out my full, unbiased Hostinger Review, where I cover every detail (good and bad) of the service.