
Table of Contents

This post contains affiliate links. If you click through and buy something, I may earn a small commission — at no extra cost to you. I only recommend tools I’ve actually used or thoroughly researched.
Pinterest for beginners can feel overwhelming fast. There’s advice everywhere — pin 30 times a day, use Tailwind, don’t use Tailwind, join group boards, ignore group boards, use video pins, use static pins — and most of it contradicts something you read ten minutes earlier.
The truth is, getting started doesn’t need to be complicated. You need to do a small number of things correctly, in the right order, and then show up consistently. That’s the whole game.
This guide gives you a clear, simple plan for your first 30 days — what to do, when to do it, and why it matters. By the end of week four you’ll have a properly set up account, a library of pins scheduled and going out daily, and a clear picture of what to keep doing into month two.
Recommended reading: Pinterest for Bloggers: How to Get Free Traffic in 2026
Before You Start: What You Actually Need
Before we get into the 30-day plan, let’s be clear about what you need in place before Pinterest makes sense.
A blog with at least a handful of posts. Pinterest drives traffic to your content. If you’ve got nothing to send people to, Pinterest can’t help you yet. Aim for at least 5–10 published posts before you invest time here.
A Pinterest business account. Free to set up, takes about ten minutes, and unlocks the analytics you need to know what’s working. You can read more on Pinterest’s own business site, but the short version is: if you’re on a personal account, switch before you do anything else.
A rough sense of your niche. Pinterest rewards focused accounts. The clearer you are about what your blog is about and who it’s for, the faster Pinterest figures out your audience.
That’s all you need to start. You don’t need Canva Pro, you don’t need a scheduler yet, you don’t need 50 blog posts. Start with what you have.
Full setup guide: How to Set Up a Pinterest Business Account
Week 1: Get the Foundation Right

The first week is all about setup. Do this properly once and you won’t need to come back and fix it later.
Day 1–2: Set Up Your Business Account and Profile
If you haven’t already, convert to or create a Pinterest business account. Then set up your profile properly:
Profile name: Your blog name or your own name — whichever you’re building your brand around. Keep it clean. No keyword stuffing in the name.
Profile bio: This matters for Pinterest SEO. Write 2–3 sentences describing what your blog is about, using the words your readers would actually search for. Be specific. “Helping beginner bloggers build traffic and income through Pinterest, blogging, and email marketing” works harder than “blogger sharing tips and inspiration.”
Profile photo: Your face or your logo. Clear, recognizable at small sizes.
Claim your website: This is the step most beginners skip. Claiming your website links your domain to your account and tells Pinterest you’re the verified creator of what you’re pinning. Pinterest gives priority distribution to pins from verified domains. Don’t skip it.
Day 3–4: Do Your Keyword Research
Before you create a single board or pin, spend an hour on Pinterest keyword research. This is the foundation everything else is built on.
Open Pinterest. Type your main topics into the search bar one at a time. Watch the autocomplete suggestions — those are real searches from real people. Note the ones relevant to your content.
Hit search and look at the colored topic bubbles that appear. These are related searches — gold for finding keyword variations and long-tail phrases.
Write down 20–30 keywords relevant to your blog. You’ll use these in your board titles, board descriptions, pin titles, and pin descriptions.
Full guide: Pinterest Keyword Research
Day 5–7: Create Your Boards
Create 10–15 boards, each covering one specific topic relevant to your blog. For each board:
- Title: Use a keyword-rich, specific name — “Side Hustle Ideas for Beginners,” not “My Favorite Hustles”
- Description: Write 2–3 sentences using natural language and your keywords. Pinterest reads these — don’t leave them blank.
- Category: Choose the closest category from Pinterest’s list
- Cover image: Optional, but worth setting — it makes your profile look more professional
Fill each board with 10–15 pins before moving on. A mix of your own content (if you have pins yet) and high-quality, relevant third-party content is fine at this stage.
Full guide: Pinterest Board Strategy
Week 2: Create Your First Pins

With your account set up and your boards ready, week two is about creating your first batch of pins.
Day 8–9: Set Up Your Pin Templates in Canva
Open Canva and search for “Pinterest Pin.” You’ll find dozens of templates at the right dimensions (1000 x 1500 pixels). Pick one that fits your blog’s style and adapt it to your brand colors and fonts.
Create 2–3 template variations — different layouts, same brand style. These are your reusable templates. Every future pin starts from one of these rather than a blank canvas.
Save your brand colors and fonts in Canva’s brand kit so they’re always one click away.
Day 10–12: Create Your First Batch of Pins
Go through your published blog posts and create 3 pin designs for each one. For each pin:
Step 1: Search your blog post topic on Pinterest and confirm your primary keyword. Step 2: Write your pin title — include the keyword naturally, be specific about what the reader gets. Step 3: Duplicate your Canva template, swap the image and headline, and download.
Don’t aim for perfection. Your first pins won’t be your best pins — and that’s fine.
I learned this the slow way. I spent a big chunk of my first month fiddling with pin designs — three or four versions of the same pin, tweaking colors and fonts, telling myself it was productive. It wasn’t. You’re far better off getting pins out, seeing what Pinterest actually responds to, and then improving the ones that earn it. Design polish is a month-three problem, not a month-one one.
Full guide: Pinterest Pin Design
Day 13–14: Write Your Pin Descriptions and Schedule Your First Pins
For each pin, write a description of 100–150 words. Put your primary keyword in the first sentence, weave related keywords in naturally, and end with a clear call to action.
Then schedule them. Pinterest’s built-in scheduler is fine to start — spread your pins over the coming week, aiming for 3–5 a day. Don’t dump everything on day one.
If you’d rather pinning felt less manual, a dedicated scheduler helps. I started with Tailwind and still dip into it now and then — the queue and suggested posting times take the guesswork out when you’re new. I’ve also leaned on Buffer a lot since, mostly because it handles my other social platforms in the same place. Either one does the job. Start with whichever fits the way you already work.
Full guide: Pinterest Pin Titles and Descriptions
Week 3: Build Your Consistency Habit

Week three is about building the routine that carries you through the months ahead.
Day 15–17: Batch Create the Next Week’s Pins
Set aside 1–2 hours and create another batch of pins — new designs for blog posts you haven’t pinned yet, and fresh variations for your best posts.
This is the weekly rhythm you’re building: one batching session a week that keeps your scheduling queue topped up. It’s far more efficient than trying to make pins daily.
Day 18–19: Get Your Blog Posts Pin-Ready
Go through your published blog posts and make sure they’re easy to save straight from your site:
- Add at least one vertical pin image inside each post (1000 x 1500 pixels, with text overlay)
- Install a Pin It button plugin if you haven’t already — it adds a hover button to your images so readers can save your content to Pinterest in one click
- Check that your featured images are high quality and would look reasonable as a pin
Day 20–21: Check Your First Analytics
By week three you’ll have enough data to spot some early signals. Go to Pinterest Analytics and look at:
- Which pins have the most impressions — what topics is Pinterest showing your content for?
- Which pins have any clicks — even one or two this early is a positive signal
- Is your overall impression count growing week on week?
Don’t read too much into the numbers yet — it’s too early to draw conclusions. But start the habit of checking analytics regularly so it becomes second nature.
Full guide: Pinterest Analytics Guide
Week 4: Review, Adjust, and Keep Going

The final week of your first month is about stepping back, looking at what you’ve built, and making sure you’re set up to keep going into month two.
Day 22–24: Review Your First Month
Look at your Pinterest Analytics for the full month. Ask yourself:
- Are impressions trending upward? Even slowly upward is fine.
- Are any pins getting clicks? Which ones?
- Which boards have the most activity?
- Is any Pinterest traffic showing up in your blog analytics yet?
Note what’s working — topic, pin design style, headline type — and plan to do more of it in month two.
Day 25–27: Improve Your Weakest Pins
Look at pins with high impressions but low clicks. These are getting in front of people but not turning them into visitors.
The most common fixes:
- The headline is too vague — make it more specific
- The design is too busy or the text is hard to read — simplify it
- The image doesn’t match the topic — choose a more relevant one
Make fresh versions of your weakest pins with these fixes and add them to your schedule.
Day 28–30: Plan Month Two
By the end of month one you should have:
- A properly set up business account with 10–15 keyword-rich boards
- A library of 30–50 pins created and scheduled
- A weekly batching routine established
- Your first real analytics data to learn from
Month two is more of the same — with better judgment, because now you’ve got data. Keep making fresh pins, keep showing up daily, keep checking what’s working.
The traffic most people expect in month one usually shows up properly in month two or three. That’s not a failure — it’s how Pinterest works. The platform needs time to understand your account and your audience. Stay consistent and let it do its job.
Pinterest for Beginners: What to Expect in Month One
Let’s be honest about the timeline so you’re not disappointed.
Week 1: Almost no traffic. Pinterest is still processing your new account and pins.
Week 2: A trickle of impressions. Maybe a handful of clicks. This is normal.
Week 3: Impressions should be growing. A few clicks a day on your best pins is a good sign.
Week 4: Some days are better than others. You might see a small but real flow of Pinterest traffic start to appear in your blog analytics.
Here’s how it actually went for me. I did get some traffic in month one — nothing exciting, but it was there, and it built as the month went on and kept climbing into month two. It came with spikes and dips that felt completely random at the time. That’s normal. Pinterest is still working out who your audience is, and that takes a while. Don’t quit before it finishes.
Month one is about building the foundation, not harvesting results. The results come in month two, three, and beyond — once your pins have had time to gain traction.
The Shortcut Worth Knowing About
If you’d rather follow a structured system than piece it together from blog posts, the course I’d point you to is Meagan Williamson’s Pinterest Beginners Course.
Meagan has been on Pinterest since its early beta days in 2011 and has helped thousands of bloggers build real traffic. Her beginners course covers account setup, keyword research, pin creation, and strategy in a clear, step-by-step format — everything in this guide and more, in one place. I took it myself, and it’s the one I wish I’d found on day one.
Free Pinterest Training Workshop
Content ideas are only useful if your Pinterest strategy is solid enough to make them work. Meagan Williamson’s free workshop — The Discovery Loop — covers the full system so your content actually gets found.
Your First 30 Days Pinterest Checklist
Use this to track your progress:
Week 1:
- Pinterest business account set up
- Profile bio written with keywords
- Website claimed and verified
- Keyword research completed
- 10–15 boards created with titles and descriptions
Week 2:
- 2–3 Canva pin templates created
- 3 pins created per blog post
- Pin descriptions written with keywords and CTA
- First pins scheduled (3–5 per day)
Week 3:
- Second batch of pins created
- Blog posts updated with vertical pin images
- Pin It button installed
- First analytics check completed
Week 4:
- Full month analytics reviewed
- Weakest pins identified and improved
- Month two content plan sketched out
- Weekly batching routine established
Final Thoughts
Pinterest for beginners isn’t complicated — but it does take patience. The platform needs time to understand your account and your audience, and the traffic it sends builds slowly before it builds fast.
Do the setup right in week one. Create consistently in weeks two and three. Review and adjust in week four. Then keep going.
Most people quit somewhere in month two because the results aren’t fast enough. The ones who stick around into month three and beyond are the ones who find out that Pinterest traffic is real, steady, and surprisingly durable.
Be one of the ones who sticks around.
Next step: Pinterest Strategy for Beginners
When you’re new, the hardest part isn’t the work — it’s knowing what to do first. That’s the whole reason I made the free Pinterest Starter Checklist below: every step you need this week, in order, on one page. Grab it, work down the list, and you’ll be ahead of most people who ever try.
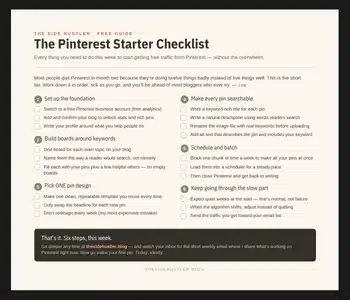
Download Your Free Pinterest Starter Checklist
Grab the free one-page checklist that shows you exactly what to do first, next, and after that.
